
 This section is documentation for an OLD release of our software!
Web on production
OMERO.web Install and Configuration
OMERO.web is the web application component of the OMERO platform which allows for the management, visualisation (in a fully multi-dimensional image viewer) and annotation of images from a web browser. It also includes OMERO.webadmin for managing users and groups.
NOTE: OMERO.web configuration has changed SIGNIFICANTLY in OMERO 4.2.1 it is recommended that you review this documentation thoroughly if you are upgrading from OMERO 4.2.0.
OMERO.web ships with OMERO platform and can be started with:
- IIS 5.1, 6.0 or 7.0 on Microsoft Windows (NEW in OMERO 4.2.1)
- FastCGI using a FastCGI capable web server such as Apache (with mod_fastcgi), nginx or lighttpd (NEW in OMERO 4.2.1)
- Apache with mod_python (deprecated as of OMERO 4.2.1 and no longer documented)
- The built-in Django lightweight development server (for testing only)
You can find more information about FastCGI and where to get modules or packages for your distribution here.
If you need help configuring your firewall rules, see the Security page.
Prerequisites
- OMERO 4.2.1 and its prerequisites
- Python version from 2.4, 2.5 or 2.6 (due to backwards incompatibilities in Python 3.0, Django does not currently work with Python 3.0; for more information see the Django Installation page).
- Python Imaging Library Packages should be available for your distribution from here
- Matplot Lib Packages should be available for your distribution from here
- A FastCGI capable web server or IIS
Pre-configuration
Configuration options can be set using bin/omero config set:
$ bin/omero config set <parameter> "<value>"
NB: The double quotes are not required by OMERO, they are interpreted by your shell/console and will be useful if you have spaces in the value or if you are using Windows. They should not be saved as part of the value (see below).
To remove a configuration option (to return to default values where mentioned), simply omit the value:
$ bin/omero config set <parameter>
These options will be stored in a file: etc/grid/config.xml which you can read for reference. DO NOT edit this file directly.
You can also review all your settings by using:
$ bin/omero config get
which should return values without quotation marks.
Quick Start
Using FastCGI (UNIX)
Once you have installed a FastCGI capable web server, configuration of OMERO.web is quite straight forward.
Choose between FastCGI TCP (recommended) or FastCGI (advanced):
$ bin/omero config set omero.web.application_server "fastcgi" / "fastcgi-tcp"Set the application host to the URL that you're going to have people connecting to:
$ bin/omero config set omero.web.application_host "http://omero.inst.edu"Place a stanza in your web server configuration file. Apache and nginx configurations can be automatically generated for you by OMERO.web as follows:
$ bin/omero web config "apache" / "nginx"
$ bin/omero web config apache
###
### Stanza for OMERO.web created 2010-11-08 14:06:57.811802
###
FastCGIExternalServer "/Users/omero/Desktop/omero/var/omero.fcgi" -host 0.0.0.0:4080

<Directory "/Users/omero/Desktop/omero/var">
    Options -Indexes FollowSymLinks
    Order allow,deny
    Allow from all
</Directory>

<Directory "/Users/omero/Desktop/omero/lib/python/omeroweb/media">
    Options -Indexes FollowSymLinks
    Order allow,deny
    Allow from all
</Directory>

Alias /appmedia /Users/omero/Desktop/omero/lib/python/omeroweb/media
Alias / "/Users/omero/Desktop/omero/var/omero.fcgi/"
Syncing media:
$ bin/omero web syncmediaStart the Django FastCGI workers:
$ bin/omero web start
Starting OMERO.web... [OK]
NOTE: The Django FastCGI workers are managed separately from other OMERO.server processes. You can check their status or stop them using the following commands:
$ dist/bin/omero web status
OMERO.web status... [RUNNING] (PID 59217)
$ dist/bin/omero web stop
Stopping OMERO.web... [OK]
Django FastCGI workers (PID 59217) killed.
Using IIS (Windows)
Once you have IIS installed on your system straight forward set of steps is required to get the ISAPI WSGI handler for OMERO.web bound to your IIS deployment.
Ensure that the ISAPI for IIS options are installed
Download and install ISAPI WSGI (we suggest the Windows Installer)
Configure OMERO.web bindings for IIS
C:\omero_dist>bin\omero config set omero.web.session_engine "django.contrib.sessions.backends.cache"

C:\omero_dist>bin\omero config set omero.web.cache_backend "file://C:/windows/temp/"

C:\omero_dist>cd lib\python

C:\omero_dist\lib\python>python omero_web_iis.py install
Configured Virtual Directory: /
Installation complete.
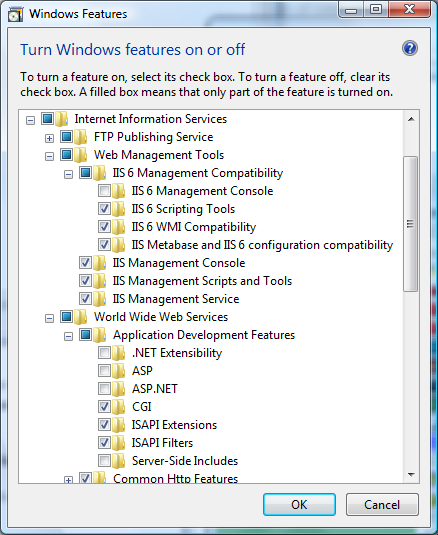
NOTE: For extended compatibility with multiple IIS versions ISAPI WSGI uses the IIS 5/6 WMI interface to interact with your IIS deployment. If you are using IIS 7 you must enable the IIS 6 WMI backwards compatibility options, an example follows:
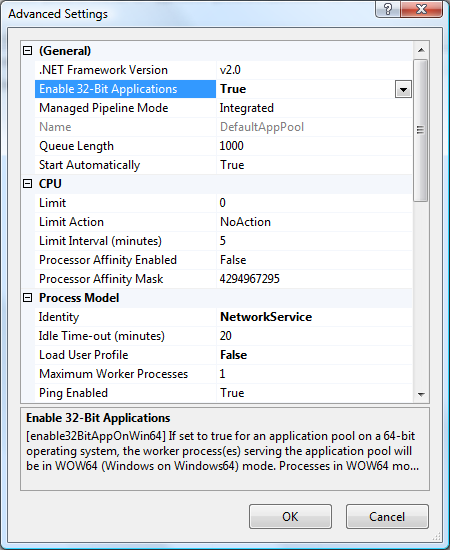
NOTE: OMERO.web and ISAPI WSGI are 32-bit applications on Windows at present. If you are attempting to run OMERO.web on a 64-bit version of Windows, you must enable 32-bit compatibility in the Advanced Settings... for the Application Pool assigned to your default Site. You can do this in the IIS Manager as follows:
Syncing media:
C:\omero_dist\lib\python>cd C:\omero_dist
C:\omero_dist> bin\omero web syncmedia
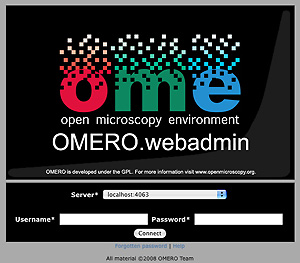
Logging in to OMERO.web
Once you have deployed and started the server, you can use your browser to access OMERO.webadmin or the OMERO.webclient:
http://your_host/webadmin
http://your_host/webclient
Using the lightweight development server (UNIX or Windows)
All that is required to use the Django lightweight development server (on UNIX or Windows) is to set the omero.web.application_server configuration option and start the server up:
$ bin/omero config set omero.web.application_server development
$ bin/omero web syncmedia
$ bin/omero web start
Starting OMERO.web... Validating models...
0 errors found

Django version 1.1.1, using settings 'omeroweb.settings'
Development server is running at http://0.0.0.0:4080/
Quit the server with CONTROL-C.
NOTE: This starts the server in the foreground. It is your responsibility to place it in the background, if required, and manage its shutdown.
Customising your OMERO.web installation
Application settings:
OMERO.web application server. Default: fastcgi-tcp.
$ bin/omero config set omero.web.application_server "fastcgi-tcp" / "fastcgi" / "development"Target bind URL for the OMERO.web install. Default: http://localhost:80/.
$ bin/omero config set omero.web.application_host "http://mydomain.com:80/"
NOTE: Please ensure you specify the port explicitly as in "http://mydomain.com:80/" rather than "http://mydomain.com/".
Web caching: The web framework supports caching for images, json data and thumbnails. To activate caching, you need to specify a cache location. This can either be a relative path from the location of the web framework code: OMERO_dist/lib/python/omeroweb OR it can be an absolute path. In either case, the necessary directories will be created automatically. E.g: to create the cache in OMERO_dist/var/weblitz_cache use:
$ bin/omero config set omero.web.webgateway_cache "../../../var/weblitz_cache"Advanced options:
Server list. Default: [["localhost", 4064, "omero"]].
$ bin/omero config set omero.web.server_list '[["prod.a.com", 4064, "prod"], ["dev.a.com", 4064, "dev"]]'Email server and notification:
Mail server hostname. Default: 'localhost'.
$ bin/omero config set omero.web.email_host "email.server.com"Mail server login username. Default: '' (Empty string).
$ bin/omero config set omero.web.email_host_user "username"Mail server login password. Default: '' (Empty string).
$ bin/omero config set omero.web.email_host_password "password"Mail server port. Default: 25.
$ bin/omero config set omero.web.email_host_port 2255Subject prefix for sent e-mail. Default: '[Django] '.
$ bin/omero config set omero.web.email_subject_prefix "Subject prefix for sent e-mail"Enabled or disables TLS when sending e-mail. Default: False.
$ bin/omero config set omero.web.email_use_tls "True"From: address to be used when sending e-mail. Default: 'root@localhost'
$ bin/omero config set omero.web.server_email "webmaster@server.com"
Administrator e-mail notification:
Admins list of people who get code error notifications. When debug mode is off and a view raises an exception, Django will e-mail these people with the full exception information. Default: empty.
$ bin/omero config set omero.web.admins '[["Dave", "dave@example.com"], ["Bob", "bob@example.com"]]'
Debug mode:
A boolean that turns on/off debug mode. Default: False.
$ bin/omero config set omero.web.debug "True"
Troubleshooting
My OMERO install doesn't work! What do I do now!?! Examine the Troubleshooting page and if all else fails post a message to our forums or ome-users mailing list or discussed on the Community page.
