
OMERO.webtagging for 5.2 and earlier versions
The following is an overview for OMERO.webtagging versions prior to 3.0, which are compatible with OMERO 5.2 and earlier.
For OMERO 5.3+ and OMERO.webtagging 3.0+ please go here
OMERO.webtagging
OMERO.webtagging is the umbrella for tools developed to enhance use of text annotations (tags) in OMERO. There are two tools at present, either or both can be installed at the same time.
Auto-Tagger
What does it do?
OMERO Auto-Tagger is a web extension for the OMERO.web client to automate the application of tags to images based on the images original filename, path and extensions.
How does it work?
When an image is uploaded to OMERO, the original filename (including extension and the path from which it was uploaded) can be preserved. It is common for a great deal of useful metadata to be encoded into this filename and/or path. In order to make use of this metadata in searches and for organisation, this metadata can be applied in the form of tags.
Terminology
- Tag - An OMERO text annotation.
- Token - Some text which has been automatically parsed from the filename after splitting up the filename by underscore. e.g. token1_token2_token3.dv
- Mapping - Selecting a certain tag to correspond to a certain token, e.g. The tag 'Deconvolved' might be selected to correspond to a token 'Deconvolved'.
Table
- Select a dataset or image (will show parent dataset) in the left panel Explore view.
- In the middle panel, change the view from Thumbnails to Auto-Tag.
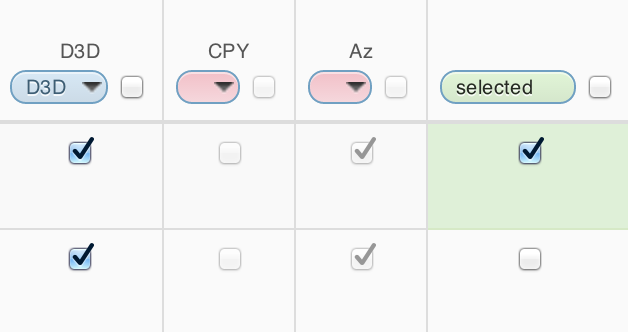
- Columns can represent one of three states. Pink and Blue column have the token name at the top of the column.
- Pink (empty tag icon) - This is a token which did not match any existing tags in the system, or there were multiple matching tags and there was no way to make a determination as to which was intended.
- Blue (familiar tag icon) - This is a token which matched exactly one existing tag and has been automatically mapped to this tag. Blue columns are also shown when the user manually applies a mapping.
- Green - This is a tag which is already applied to some images in this dataset, but does not match any of the tokens.
- Blue/Pink tag icons have a dropdown menu which has a number of options. In the case of multiple matching tokens, these will be presented and thus selected. It also offers a choice of None to select no mapping for this column. No mapping means that no tags will be applied for this column. Finally, it offers access to a dialog to create new tags or select an existing tag to map to.
- Green tag icons have no dropdown as there are no action to perform currently. If the user chooses to map a token to the Tag displayed in a green column, the green column will be removed in favour of the new mapping.
- Each row in the table represents an image in the dataset, the full filename is in the far-right column.
- Each row has a checkbox for each column. Blue/Green column's checkboxes are enabled as they correspond to tags, pink columns will need to be mapped before selections can be made.
- Checkboxes are auto-selected if the image already has the current tag applied to it, or if the token for this column is present in this image.
- If the image has the current tag applied to it then the cell will have a green background highlight.
Toolbar

- The Path checkbox hides/displays the tokens that were parsed from the path part of the filename. Regardless if this is hidden or displayed, mappings and checkboxes will be applied upon Apply.
- The Extension checkbox hides/displays the tokens that were parsed from the extension part of the filename. Regardless if this is hidden or displayed, mappings and checkboxes will be applied upon Apply.
- The Apply button saves changes.
- The Refresh button resets the table to the original state without applying changes.
- The Ignore First File Token checkbox will cause the first token (by location) in the file part of the filename to be ignored upon refresh.
- The Ignore Last File Token checkbox will cause the last token (by location) in the file part of the filename to be ignored upon refresh.
Instructions
- Modify the tag mappings for each column as appropriate. Remember to modify the hidden path/extension columns. Leave/set any undesired mappings to None.
- Check/modify the checkboxes to the desired state.
- Press Apply to save the changes. The table will update to reflect the saved state.
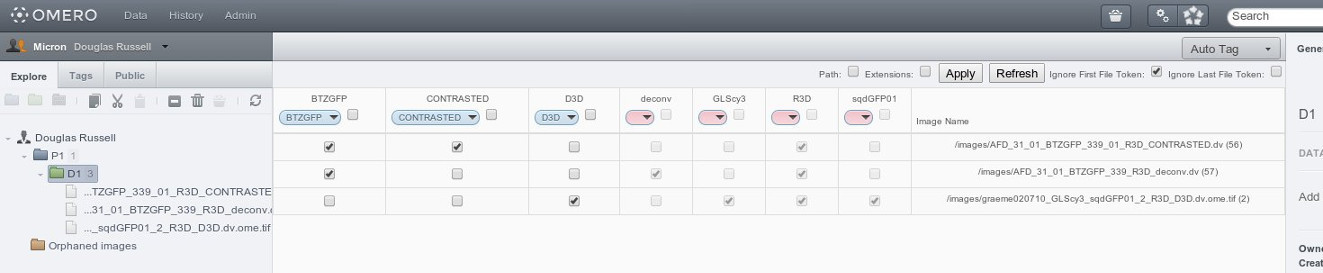
Before 'Apply'
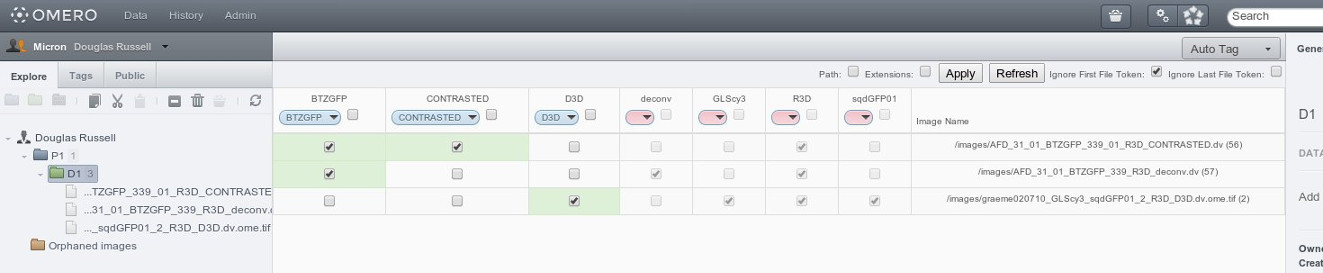
After 'Apply'
Notes
- Tokens that are only numbers are ignored as these seem to be very numerous and it is impossible to intelligently map them at this time.
- The Ignore First and Ignore Last checkboxes are an initial effort to deal with a difficult problem. Each image will have some unique information that is not a field to normally tag on. If each image has just one of these, then there will be a column for each of those unique tokens. In a small dataset this is not a problem, but in a large dataset, most of the tokens will end up being these undesired ones. This unique data is often stored at the start or end of the filename.
- The filename is currently tokenised using underscores as the splitter.
Tag Search
What does it do?
OMERO Tag Search is a web extension for the OMERO.web client to search data using tags. The search is continuously refined, when a search term is entered, the list of available search terms is reduced to only those which could also be applicable. This can be used a bit like navigating a filesystem hierarchy.
How does it work?
When images (or projects and datasets) have tags applied to them, these can be searched with the Tag Search tool. Initially a list of all tags is shown as a starting point. Once an initial choice has been made then the tool will only present the tags which are applicable based on the first term. This is best explained with an example:
Some images in our system:
Image1: Tag1, Tag2, Tag3, Tag4
Image2: Tag1, Tag2, Tag5, Tag6
Image3: Tag2, Tag7
Initial list of possible tags: Tag1, Tag2, Tag3, Tag4, Tag5, Tag6, Tag7
If the user selects Tag1 as the initial term then this would refine the search to only Image1 and Image2. The remaining tags possible to select as part of the search would become: Tag2, Tag3, Tag4, Tag5, Tag6. Tag7 is excluded because it is not present on any images which have Tag1. If Tag6 was then selected as the second term then the search would be refined to only one image (Image2) and the list of available search terms would become: Tag2, Tag5. With more tags in the system it is likely that several more refinement steps will be necessary to reach the selection of results required.
Instructions
To enter the tagsearch view simply click on the Tag Search link in the top navigation bar. Click in the search field in the left hand panel and select an initial tag. the number of search results being returned is also listed in the left hand panel. Continue to refine the search until the view of the results is desired and then check the preview box
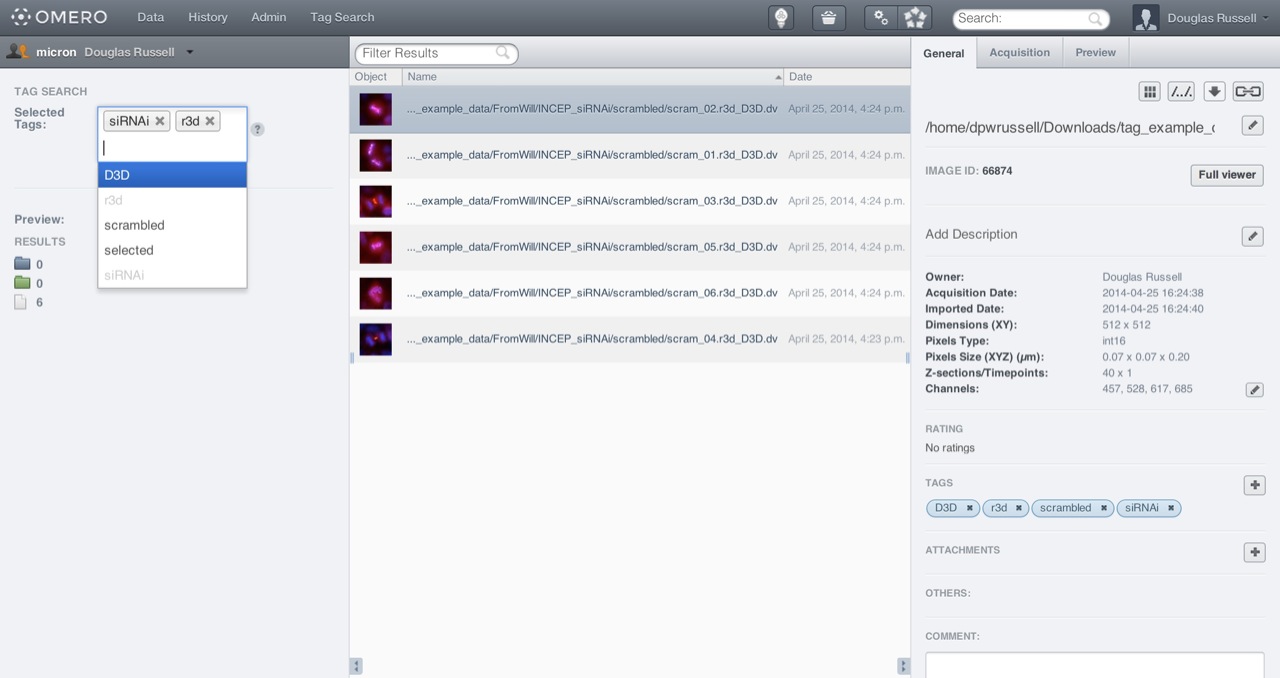
Tag Search
Upgrade
Upgrading is normally just a matter of replacing the autotag and tagsearch directories with the ones from the latest release (Download link).
The only exception to this is if upgrading from version 1.0.0. There is a small change in the configuration below due to bundling all the webtagging tools together. Simply follow the install procedure below to ensure correct installation in this case.
Installation
As web extensions for the OMERO.web client, installation is done by a systems administrator and will then be available to all users of that server. Adding the webtagging extensions is very easy, as you can see below in "Installation steps". To install only one of the tools (for example just "autotag" or just "tagsearch"), ignore the instructions that relate to the other.
Requirements
Python 2.6+ OMERO 5.2+, 5.1+, 5.0+ or 4.4+
Installation steps
Download the release compatible with the version of OMERO you are using:
- For OMERO 5.2.x, download OMERO.webtagging version 2.0.0.
- For OMERO 5.1.x, download OMERO.webtagging version 1.3.0.
- For OMERO versions earlier than 5.1.0, you will need to install OMERO.webtagging version 1.1.0 instead.
Unzip the package into a temporary directory, inside this will be an autotag and tagsearch sub-directory.
Move the autotag and tagsearch directories into a directory that is on your PYTHONPATH (only supported for OMERO 5.x), or into the OMERO /lib/python/omeroweb/ directory.
Add webtagging extensions to your OMERO.server config:
For OMERO 5.x:
$ path/to/bin/omero config append omero.web.apps '"autotag"' # NB: double quotes, OMERO 5.x
$ path/to/bin/omero config append omero.web.apps '"tagsearch"' # NB: double quotes, OMERO 5.x
For OMERO 4.4.x, you'll need to 'set' the whole list, as append is not supported:
$ path/to/bin/omero config set omero.web.apps '["autotag", "tagsearch"]' # OMERO 4.4.x ONLY - don't forget to add your existing web apps to the list.
Add autotag configuration option (not necessary in OMERO 4.4.x) to enable the auto-tag UI in the central panel of the webclient:
$ path/to/bin/omero config append omero.web.ui.center_plugins '["Auto Tag", "autotag/auto_tag_init.js.html", "auto_tag_panel"]'
Add tagsearch configuration option to add a link to the top navigation bar of the webclient:
For OMERO 5.x:
$ path/to/bin/omero config append omero.web.ui.top_links '["Tag Search", "tagsearch"]'
For OMERO 4.4.x, you'll need to 'set' the whole list, as append is not supported:
path/to/bin/omero config set omero.web.ui.top_links '[["Tag Search", "tagsearch"]]' # OMERO 4.4.x ONLY - don't forget to add your existing web apps to the list.
Restart your omero web server.
Feedback, Bugs, etc.
I would be very pleased to hear from anyone who has problems, suggestions or feedback via github's issue reporting feature.
